Several months ago we received a small but very interesting package from Syrp. Inside the company’s signature round cardboard box we found the Genie Mini – a motorized head for panning and shooting videos and timelapses with wireless control.
After our recent review of the Lume Cube LED which can be operated using a simple app on your smartphone, comes another app controlled photographic (or rather videographic) accessory – the Genie Mini by Syrp.
We have actually been waiting for some time to test this one. We always wanted to be able to do smooth panning but we never got to master the skill (perfect video pan requires a good video head and quite a bit of trial and error unless you have a lot of experience).
Of course the Genie Mini can do more, much more – it can help you capture much more interesting timeplases and with the recent introduction of an improved firmware/app you can now even use 2 Genie Mini units to do both pan and tilt as part of your shooting (and with a regular Genie you can add forward movement as well).
The Genie Mini – small compact and very useful
 Here are some of the basic features of the Genie Mini:
- Load capacity: Panning Load: 17.6lbs / 7.98kg Tilting Load: 11lbs / 4.99kg centered
- Internal battery (with Micro USB Charging Cable).
- Max Speed: 360° in 33 Seconds.
- Built in Bluetooth Connectivity with iOS and Android App.
- Custom Control, HDR and Presets options.
Design and build quality
The Genie Mini is really small (3.5 inches/9 cm in diameter) and under 230 grams (8 once). This is just the size that allows you to take it with you with even a small camera bag without thinking too hard if your really need it.
It is covered in black rubber which is nice to hold and has a top and bottom covered in a material that looks like cork. The idea (we think) is that if you put your camera or tripod it will not attach to the unit in such a way that you will have a problem removing it – and it actually works great (we never had any problems).
You havea 1/4″ 20 male screw on top and a female 3/8″ at the bottom (with a small metal converter to 1/4″ 20 if you need to).
On the front you have 4 things to look at – the on/off button (turn the unit and the BT on and off), a micro USB charging port and two connectors – one 2.5″ and one 3.5″. The first is for connecting to the camera when you shoot timelapses and the second for connecting to a second Genie Mini (for tilting – see this Syrp tutorial) and IR cable (which doesn’t come with the unit).
The only thing that we don’t really care for about the unit design is the on/off button. We would prefer a switch (and one which isn’t easy to turn on by accident – unlike the current button (we also found that sometimes it isn’t as simple to turn off the unit). Another thing on our wishlist – a programmable button than will allow users to shoot a simple timelapse or video without a need to start the app.
General build quality is just great and although the unit isn’t waterproof you can probably protect it to a degree against rain with a plastic bag for example (although we are also not sure if we would really love to shoot timelapse in a purring rain anyway).
Using the Genie mini and the app
For the most part we used the unit for videos. Some people might find this strange as they might be used to panning manually – however we always found this hard and we were never pleased with the results that we got, partly because of our gear – you do need a decent fluid head for that, but more because we always feel that even if we can create a smooth motion, the speed is either not constant or too slow or too fast (it is hard to explain this but there is a movement speed which feel “normal” to our brain – anything faster or slower will look unnatural – a speed of 10-15 percent with the Genie mini typically feel like normal speed to us).
After you install the app (we used the Android version on our One Plus One smartphone), you need to connect the Genie mini to the app. This is simple just make sure you choose the Genie mini and not the virtual unit (Syrp should change the virtual unit color on the menu in our opinion).
The main Genie Mini app screen
 Now you are good to go – just choose from the main menu if you want a to shoot video or timelapse and start shooting. Well, actually there is a bit more things you need to set before that and a few other options that you need to be aware of. In the video mode you can control the:
- Speed – how fast the Genie mini will turn (we choose around 10% – anything above this is noisy, plus this seems to be a nice speed that feels natural for relatively close shots).
- Play time – pretty self explanatory – how long the video that you are going to record will be (mind you – in video mode you actually record the video – the camera isn’t connected to the Genie mini – so you can continue the video before and after the Genie mini moves).
- Mode – there are several modes including repeat off (what we use – single pan and stop) continuous (back and forth forever), repeat (one back and forth), bounce (the same thing but with repeat the back is in 100% speed).
- Ease in/ease out – gradual increase in speed in the beginning and end of the video (we just used the default 2 sec).
Of course in the main part of the screen you have a 360 degree representation of the movement of the unit – you can set with your fingers the arc of the movement (how many degrees do you want the Genie mini to pan) and by pressing the CW you can also change the direction of the movement to counter clockwise).
The Genie Mini video main screen
 This is all very simple and works great – the only annoying thing – the Genie mini sometimes return to the starting position from the wrong side (in other words if you choose a 20 degree turn – it moves 340 degrees to the start position instead of getting back 20 degrees – annoying but it only happens from time to time – this can probably be fixed in software/firmware).
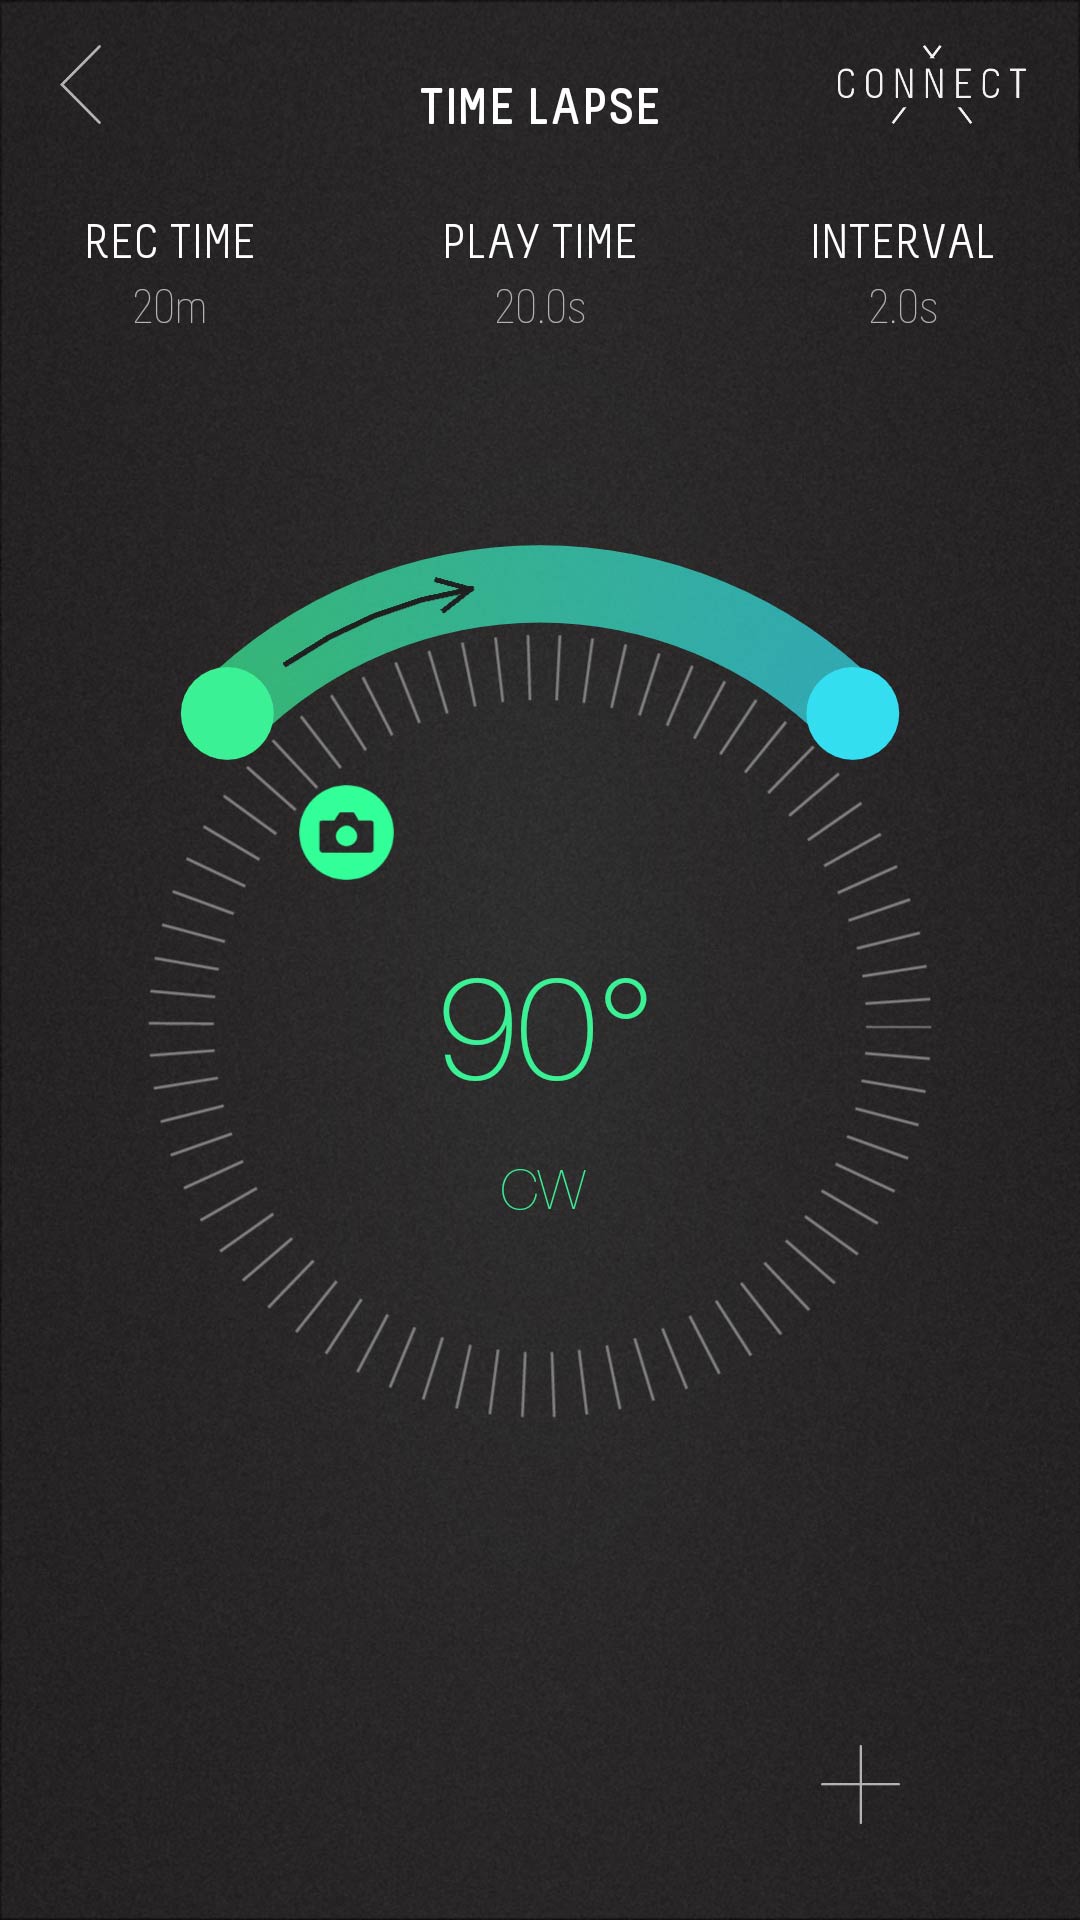
On the timelapse side (which we have to admit we used far less as we are still very much beginners when it comes to shooting timelepses as you can see from the video above, but we are learning fast) you have a few other options:
- Record time – how long do you want the recording to be (basically how much time are you willing to sit down and wait).
- Play time – how long is the end video going to be.
- Interval – the time between each shot.
- Ease in/ease out – gradual increase in speed in the beginning and end of the video (we just used the default 2 sec).
- HDR – you will need to turn on bracketing in your camera mind you.
- Movement type – the normal is move shoot move – you also have contentions for GoPro etc.).
The Genie Mini time lapse main screen
 If you are into timelapse and you are just starting, we highly suggest that you watch some tutorials because you do need to understand some basic things – otherwise your results might not turn exactly like you wanted them – we would suggest that you check out some of the videos that we have in our timelapse tips section here on LensVid.
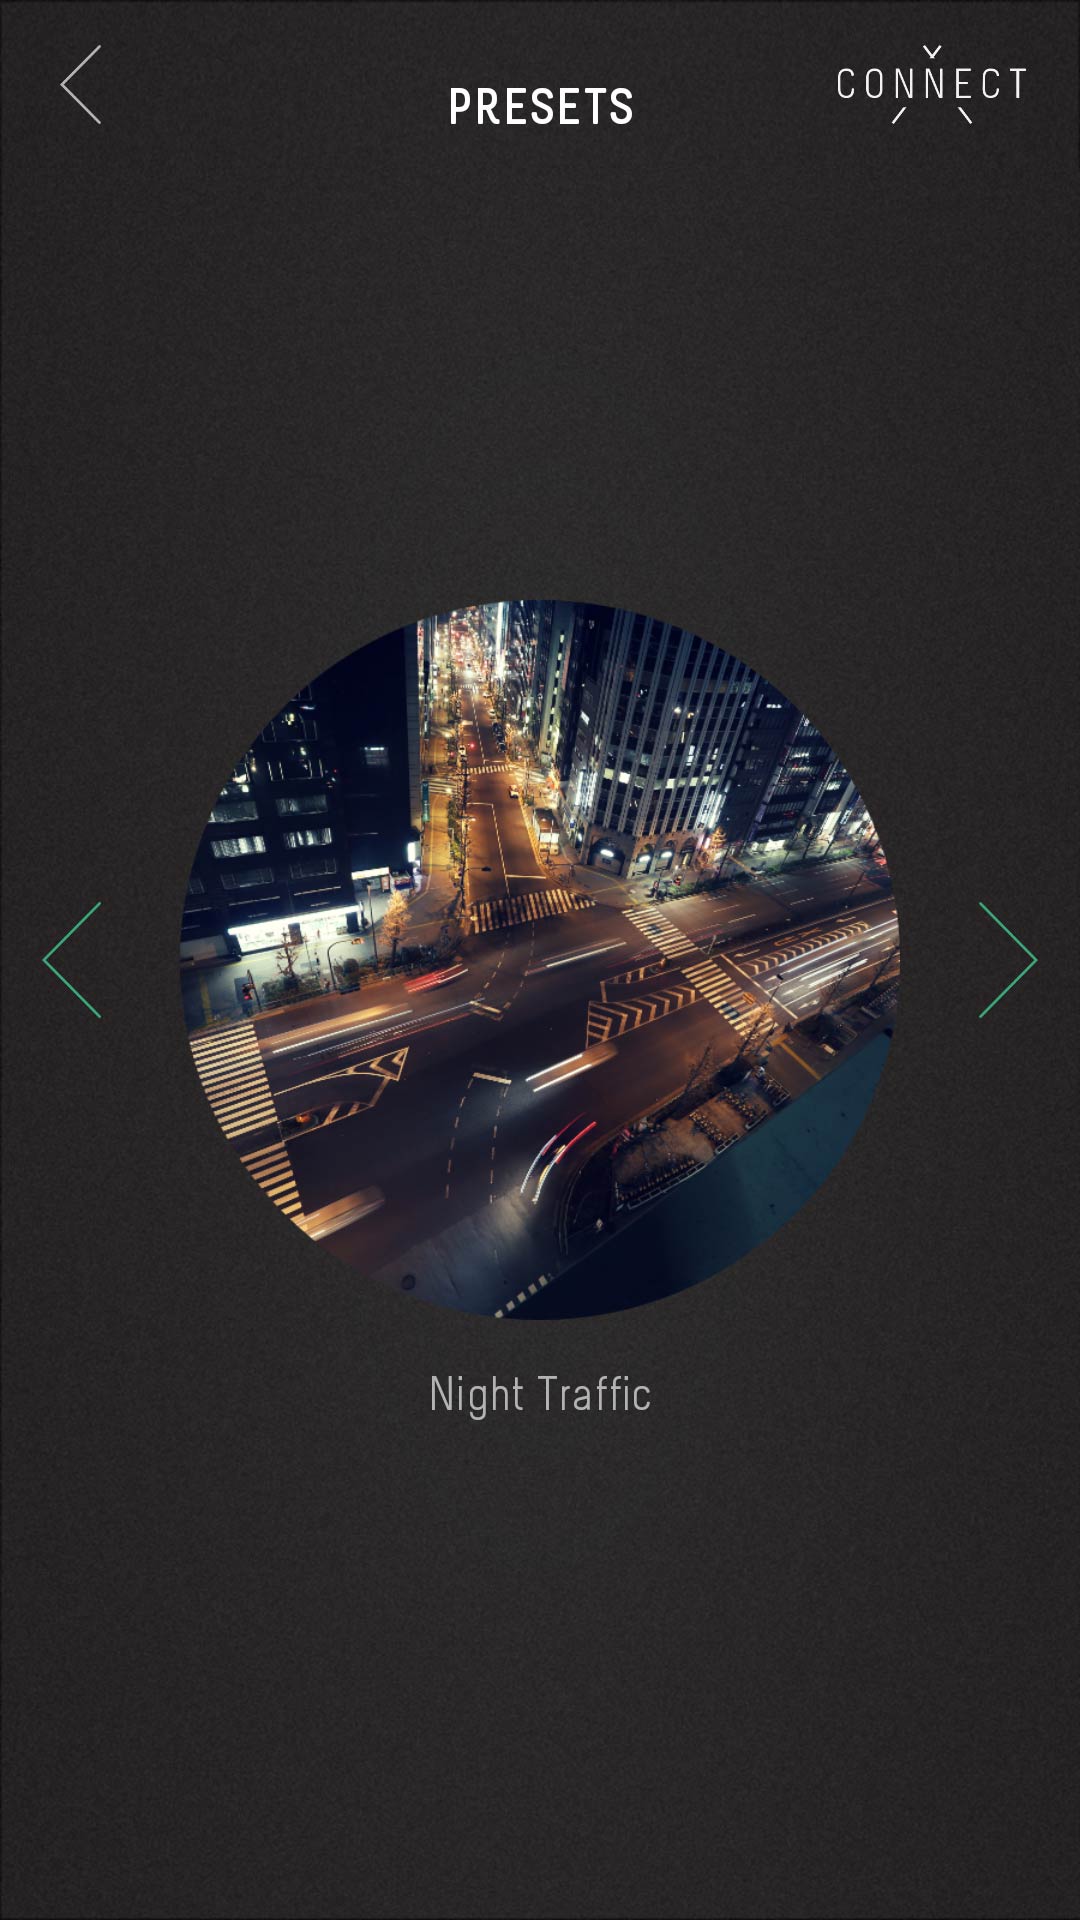
You also have presets if you don’t want to set things manually
 Conclusion
We are not going to beat about the bush for too long on this one – we simply love the Genie mini and if you have any interest in timelapses or in adding some movement to you video work (and that should be true for any type of stationary video work – especially for b-rolls), the Genie mini is for you.
The Genie mini isn’t just fun to use (it is really easy to control from the app), but as we discovered in the last few months of using it for our videos here on LensVid, it is also has great production value – it allows for smooth and especially very continuous movement which we find hard to reproduce manually (at least if you don’t have a high end fluid head, years of panning experience or you are willing to spend time shooting and re-shooting each take). Since setting it up is quick and using it is super easy – there is simply no reason not to use it.
There are some very minor things that we like to see improved like a switch instead of the power/BT button and maybe some minor app/firmware updates (for example fixing the way the unit get back to the original position – taking the longer route) but these are all fixable or negligible.
At around $250 the Genie mini is not what we would call an impulse purchase but it is inexpensive enough that we think that any videographer should have at least on in his bag at all times. That is even true for those who have very little interest in timelapses (like us).
What we liked
- Well built.
- Small, compact and light weight.
- Decent battery life (USB charging with internal battery).
- Smooth movement (more than we were ever able to get with our gear – especially for slow speeds).
- Advanced options and great and easy to use app.
What we think could be improved
- Above 10-15% speed the motor is a bit noisy.
- The app doesn’t always reconnect automatically to the unit (but can easily be done manually).
- We would have preferred and on/off switch instead of a button (which sometimes turn on accidentally).
You can check out more LensVid exclusive articles and reviews on the following link.
You can support LensVid by shopping with our affiliate partners
Affiliates: Amazon, B&H, Adorama and E-bay.
Why should you trust us?