As we have mentioned several years ago on our rather popular RC2 vs. Arca Swiss video – we use the Manfrotto style RC2 system for most of our daily work – both for cameras and many larger accessories.
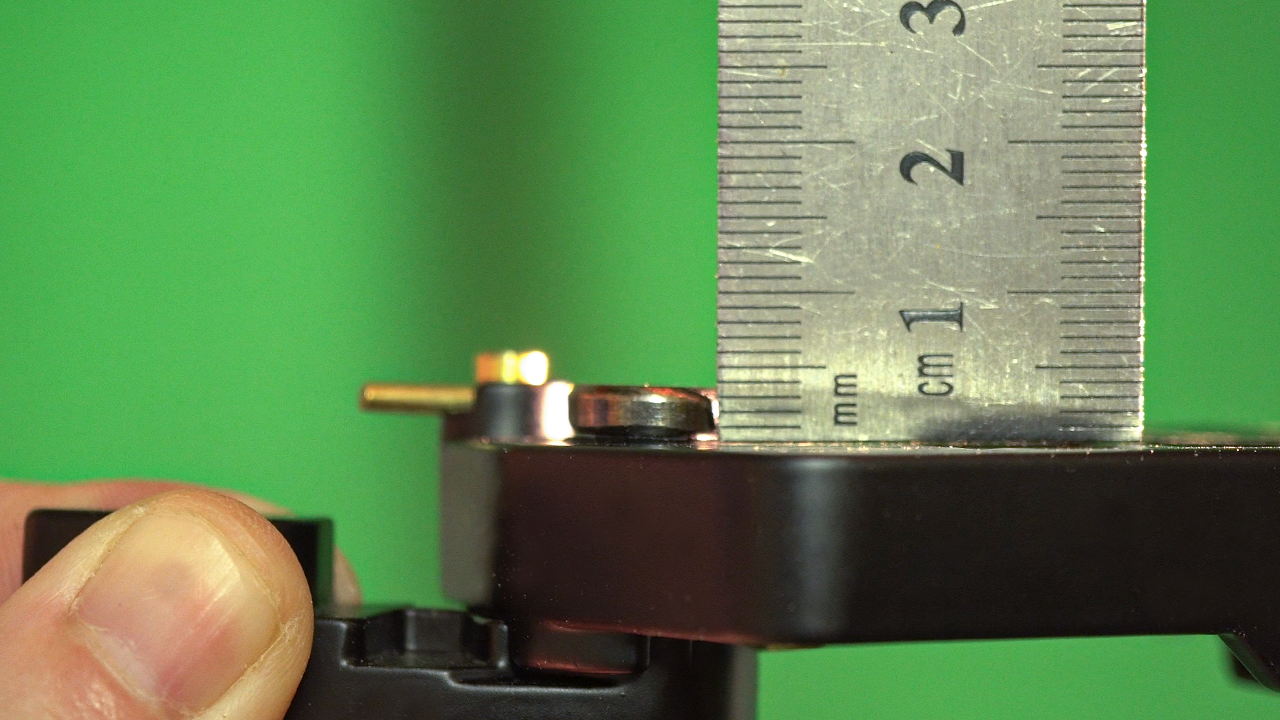
While this system is not ideal for heavier loads it does work extremely well for us with light-medium loads. It does have one major flaw which had been bugging us and quite a few other users for years. The base of the RC2 system (aka Manfrotto 323) is not flat and the tiny secondary lock protrudes about 5mm from the rest of the base.
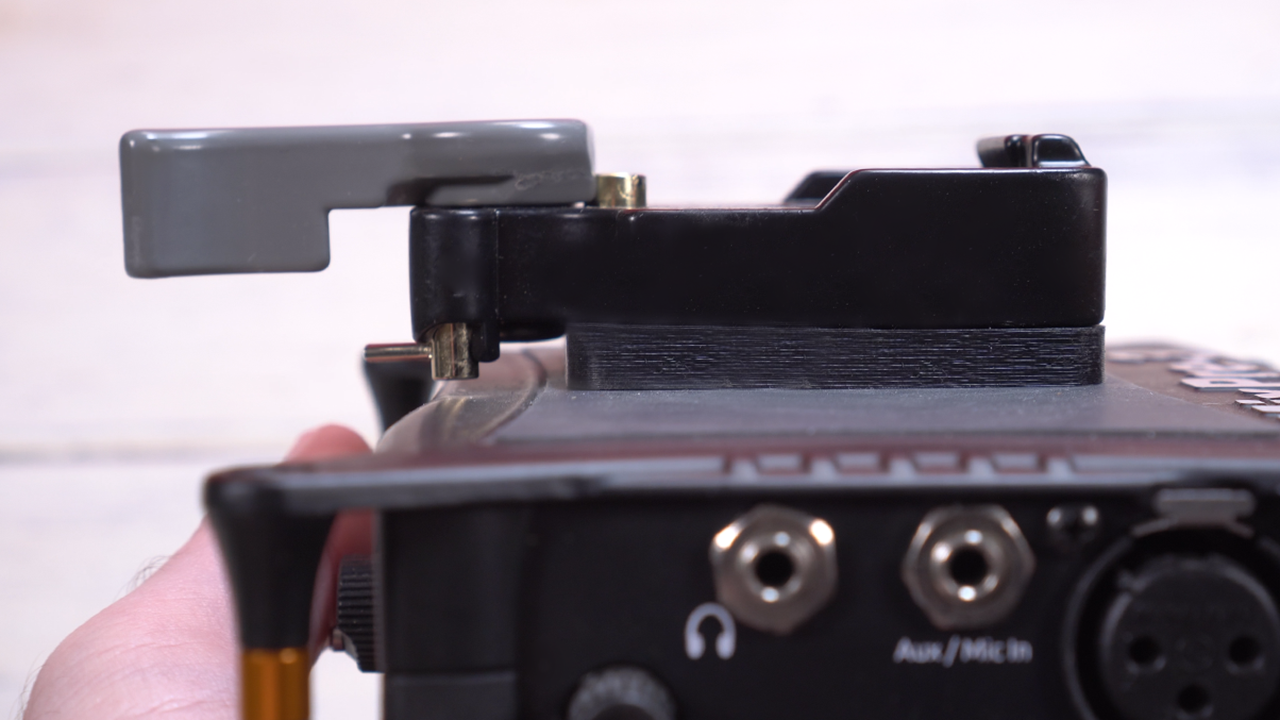
This means that you can’t connect it directly to flat objects like the top of our Mixpre 3 recorder where we like to connect our camera when we are shooting on a tripod.
In the past, we tried all sorts of fixes including washers and all sorts of attachments and connectors but didn’t found anything simple and practical that didn’t twist. Recently we came across a possible solution on the 3D printing website thingiverse which was designed to give the necessary space for the RC2 base.
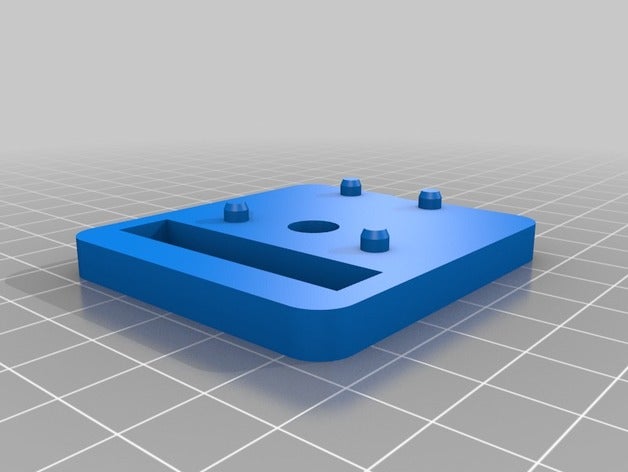
3D printing useful photo accessories parts (the RC2 flat addon from thingiverse)
Since we don’t have a 3D printer (yet) we ordered three copies of this design printed from the thingiverse site (about $17 including shipping) and got them a few weeks ago.
The prints themselves were fine but we immediately realized that the design itself was flawed. The RC2 base has holes and the design if flat (apart from some tiny “pins” which do not seem to align with the holes and seem to be unnecessary and may be used for structural support for the print). There was also no way of connecting the base to the 3D part and the hole in the middle had no threads so you could not connect it to anything unless you were using a long 1/4″ 20 or 3/8″ 16 screw which isn’t always possible (the retracting screw on our MixPre 3, for example, is very short and can’t be replaced).
The RC2 base – the tiny secondary lock prevent the base from connecting to a flat surface
So we went into our shop to try and fix these issues. First, we removed the four small pins and sanded the base to make it nice and flat. Then we moved on to fix the threads issue.
We used our speed tap to make a 3/8″ 16 thread. You don’t need to pre-drill this hole – just use the tap on the existing hole – but be 100% sure you are drilling at a 90-degree angle – we got it just slightly off which isn’t ideal at all.
Tiny pins – we really want to see a better 3D design
If you want good strong connection you should use a Brass 3/8″-16 to 1/4″-20 adapter – you can take the one from the RC2 base itself or use another one (they cost less than $1).
The problem is that the adapter is deeper than the 3D printed part (another design flaw) so we needed to make a countersink so that its wider part will sit inside the 3D printed part and only the narrow side will come out into the RC2 base. Just make sure you don’t over drill as we did.
We choose a dual method for connecting the 3D printed part to the RC2. We used Sugru a – form of moldable glue which hardens after 24 hours to fill the RC2 base holes and prevent movement as well as super glue on every part of the base which touches the 3D printed part. It is possible that the superglue is enough and we suggest using more Sugru than we did – at least 2 units or even 3 which can be a bit expensive (again, a better 3D design would have prevented this).
We also used a bit of super glue on the Brass 3/8″-16 to 1/4″-20 adapter to fix it inside. This limits us to using only 1/4″ 20 with the base but that is fine for most times when we actually need a flat base.
Finally, we used a clamp to hold it down securely while the Sugru hardens for 24 hours. The resulting piece came our pretty solid and seems to work exactly as we hoped it would.
So this was our first experience with 3D printing useful photography accessories. We also have a request – if you are handy when it comes to 3D printing – take the original design that we have used here and try and improve it – make it just a few mm thicker for the adaptor, add some plastic “pins” in the right places so using Sugru will not be needed and if possible add a 3/8″ 16 threaded hole in the center with countersink.
After some work – the base with the 3D printed part – now it connects
We have actually talked to Manfrotto about this as well as to a few other manufacturers, asking them to make a flat base version of the RC2 quick release system or at least provide a low cost metal add-on that you can buy and attach to your existing RC2 base and make it flat and we are still hoping that one of them will pick up the glove – if you also want to see this please write to us in the comments – it will help us sell this the manufacturers.
You can check out more LensVid exclusive articles and reviews on the following link.
You can support LensVid by shopping with our affiliate partners
Affiliates: Amazon, B&H, Adorama and E-bay.
Why should you trust us?