For the past several months we have been using a camera Rig that we created for our own use here on LensVid. This video and article will show you in detail how we created this rig and the way we use it.
Following our recent “Off The Shelf Overhead Camera Rig DIY Build” we decided to do a second DIY video showing our video rig that we have been using to shoot on LensVid, how we created it, the different components and how we work with it.
The rig is built around a cage, however unlike many videographers who use a camera specific cage – we looked for something which is universal as our goal was to create a rig/cage that will fit more or less any camera that we will get for testing (from small mirrorless cameras to large DSLRs). This requirement forced us to look outside the box (actually outside the cage) and is what started us thinking on how to assemble the rest of the parts we needed.
Creating the perfect camera rig for LensVid
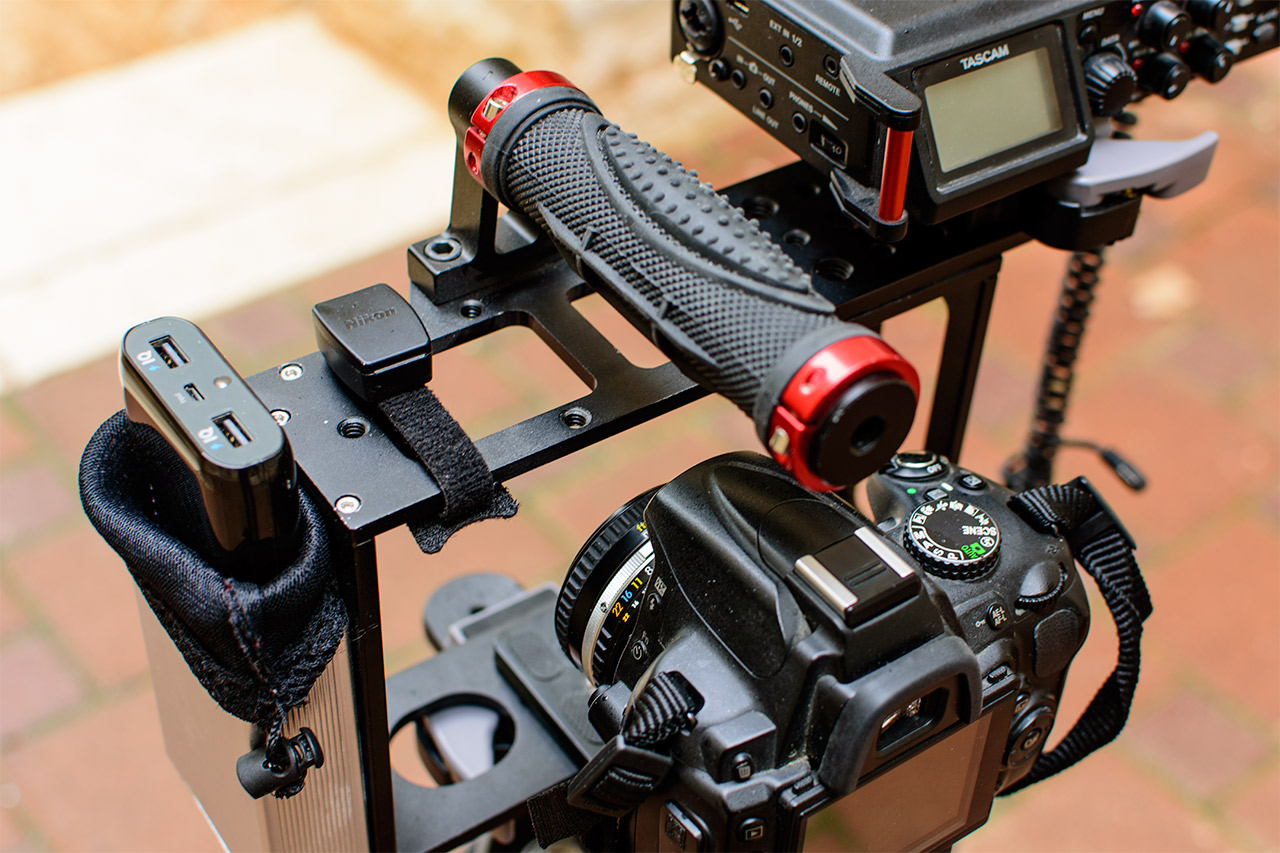
 The second requirement was sound. We currently use the Tascam DR70D which is a great 4 channel field recorder and we wanted a way to mount it onto the rig in a comfortable way together with the Sennheiser AVX which is our go to wireless microphone system. To power both of these units we also needed a powerful yet compact battery and a place to carry it. All of these set our basic requirements for the project while a few others were added as time went by including working with a single type of quick release system (Manfrotto 323 RC2 System) for more or less everything and a way to control our camera using an app with a tablet (we also sometimes use a laptop) which required some unique mounting.
The following is a summery of all the components we used to build our rig which fill all the above requirements.
The components and the build
Video DSLR Camera Cage – this is the basis for our entire build and the most important part of this project. We got a no name one from ebay which worked great apart from the fact tat it was too short when used with a quick release – forcing us to use a long plate and put our camera behind. Apparently since we got ours there are new versions of this cage which is taller and has both 1/4″ 20 and 3/8″ threads all over (ours has only 1/4″ 20) but it looks pretty similar and cost almost the same – it might even be possible to place a quick release with a tall camera inside this unit (although we did test it so we can’t be sure).
Price (for the new version) under $70.
Our cage – a look from above
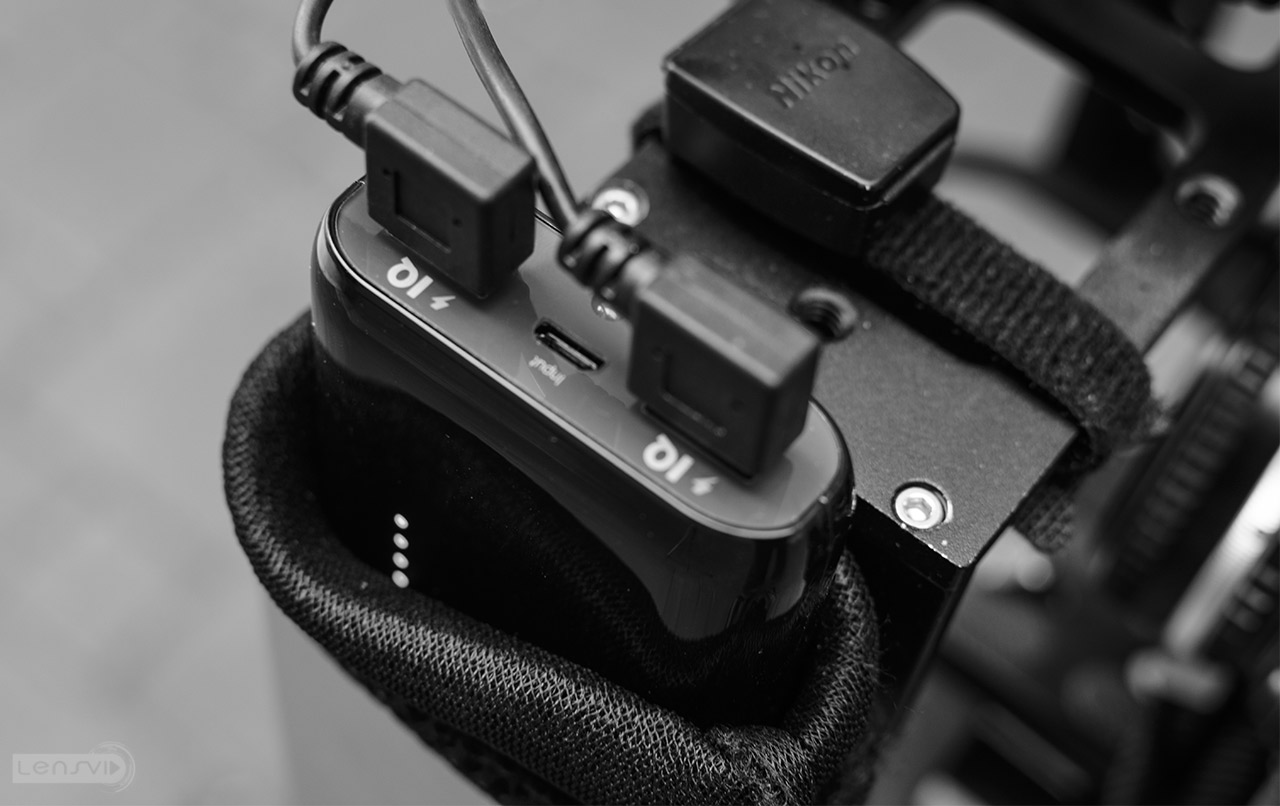
 Anker 2nd Gen Astro E4 13000mAh External Battery – Anker is hands down one of our favourite USB battery manufacturers. The Astro E4 is a very capable battery (there is also the E5 version with a 16,000mAh if you want a little more power in the same size case!) and it can power both the DR70D and the Sennheiser AVX for countless hours on a single charge. We could only wish there was a battery that could also power our camera at the same time on this size/price level (but this is wishful thinking at this point).
Price: Anker Astro E4 Classic 13000mAh Portable Charger – $30.
Anker 2nd Gen Astro E4 in the cage connected to our DR70D and AVX
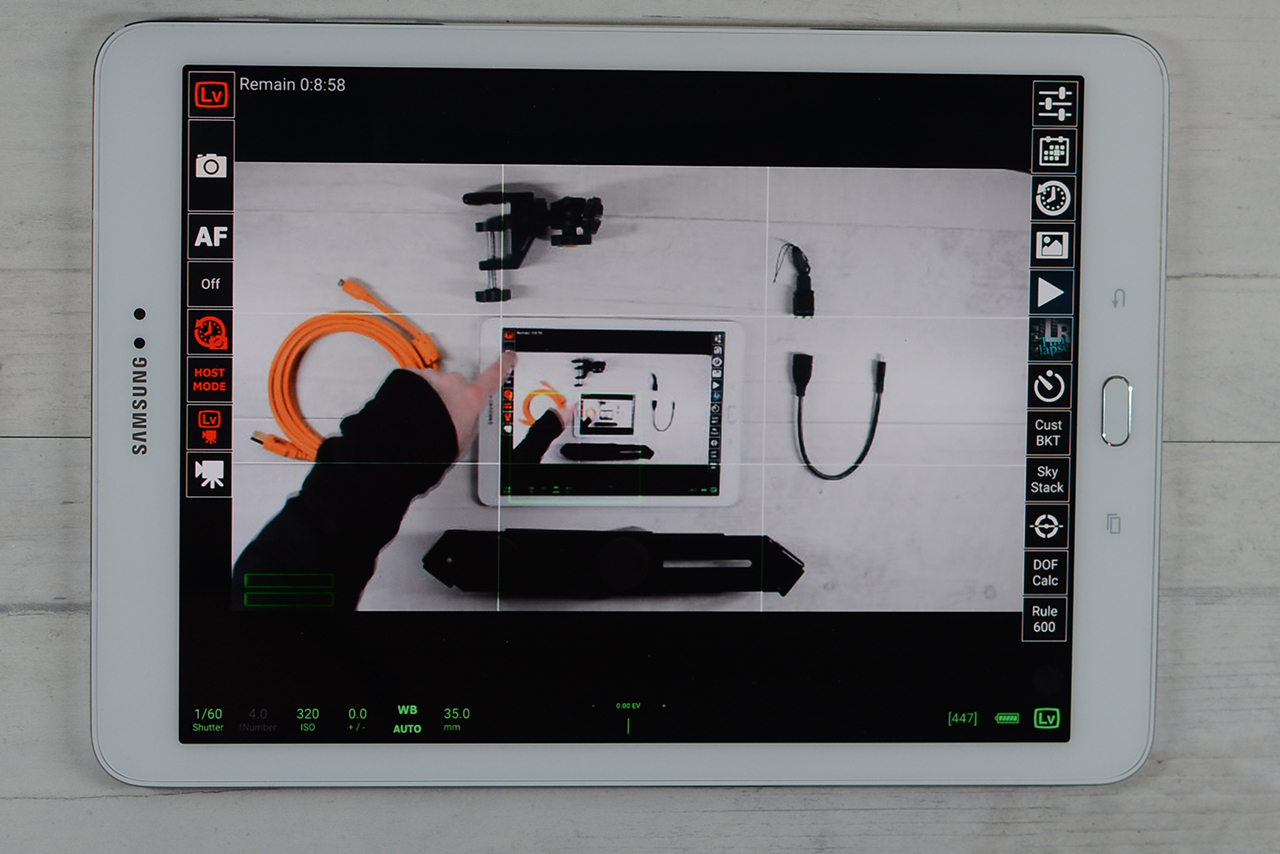
 DSLRdashboard: As we mentioned in our DIY overhead camera rig video/article, DSLRdashboard has been our go to software/app for shooting video on LensVid for a long time now. It has so many options for shooting video (and stills) and controlling our camera that we decided to do a separate video just to cover them. On this video we mostly focused on how we mount our tablet (although we still use the free PC software version of DSLRdashboard quite a lot as our laptop is larger than a tablet).
We recently discovered that Nikon’s new line of cameras which has a built in WIFI can’t use it to start/stop video with DSLRdashboard – this is a very big minus for Nikon and we really hope that the company will fix this problem in the future. Meanwhile we shall continue to use our D7100 with the WU-1a Wireless Mobile Adapter which doesn’t have this limitation.
Price: $10 for Androind/iOS (or free for PC/MAC/Linux).
The DSLRdashboard app in action
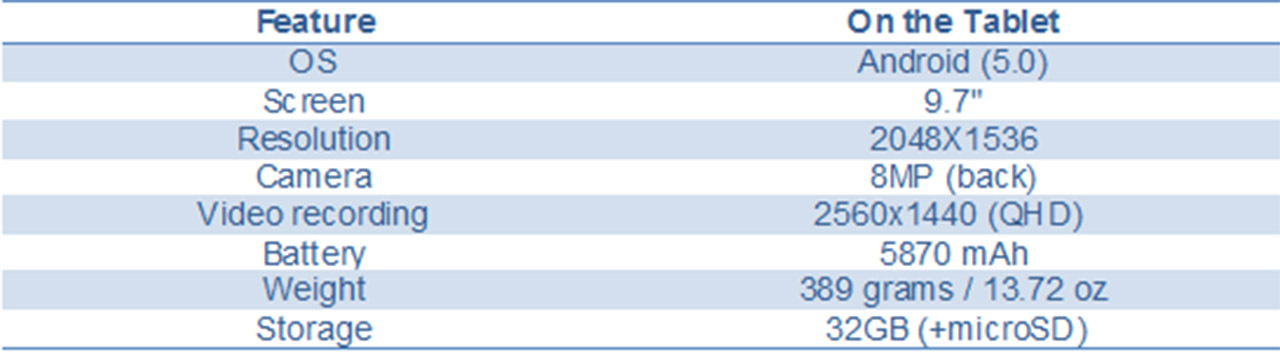
Samsung Galaxy Tab S2 9.7″: Again, like our last DIY project we used the new Samsung Galaxy Tab S2 9.7″. You can probably use more or less any tablet (or even smartphone – although with most the screen will be too small), but we really enjoyed the S2 with its great screen and general lightning-quick response. Here are some of its specs:
 The only tiny inconvenience has to do with the OS – apparently in the Android version we had on the device we couldn’t find a way to tell the tablet to always connect to our WU-1a Wireless Mobile Adapter when it is available instead of the regular WIFI connection – no big deal just another step we had to make.
Price: $450.
Tether tools accessories
When we decided to produce this video we talked to Samsung who were happy to supply us with a sample of the Tab S2 to demonstrate working with the DSLRdashboard app, but we also wanted to show a way of mounting the tablet and after reading some reviews and searching online we found the AeroTab Universal Tablet System as one of the most highly rated tablet holders with 1/4″, 3/8″ and 5/8″ connectors.
The different accessories tether tools sent us for this project
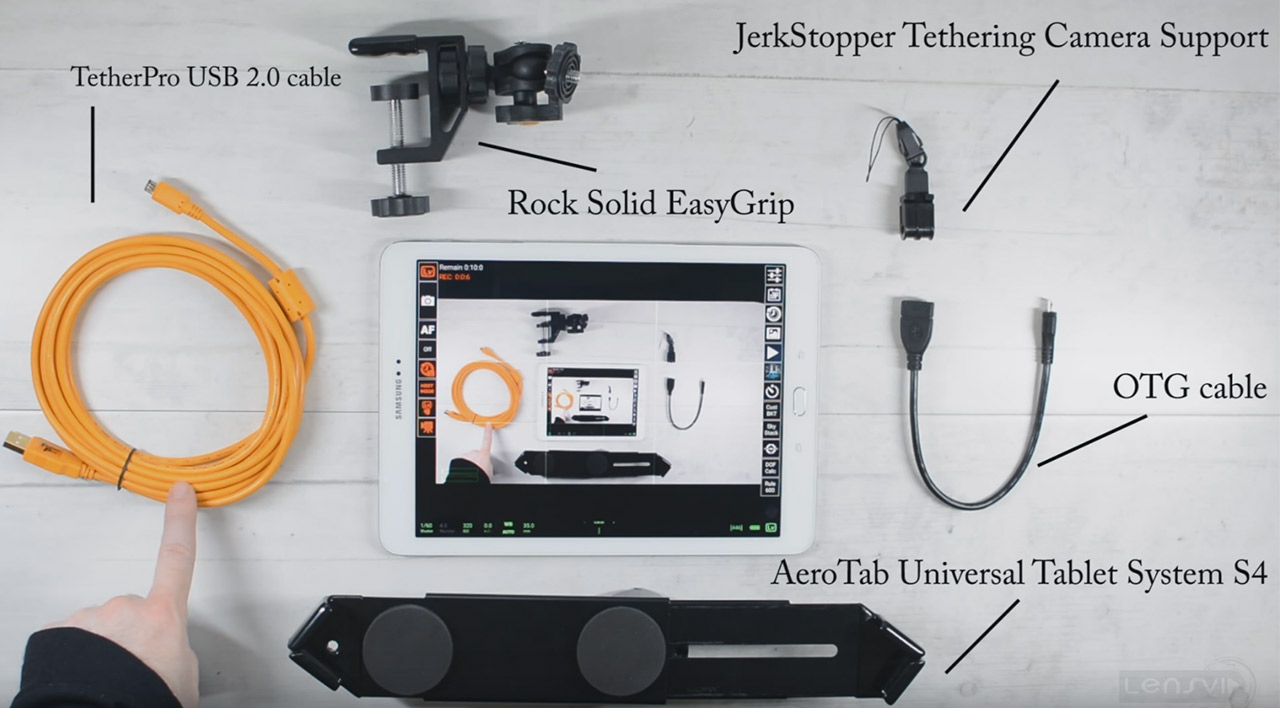 We quickly contacted Tether tools and they were extra nice and sent us a sample of the AeroTab Universal but also a number of other products which you can see in the screenshot from our video above (we might do a separate quick video on some of them later on but they are all pretty effective for either securing the AeroTab onto your tripod/desk or connecting your camera to it and making sure that the cable will stay secure).
The only drawback of the AeroTab is the price – at around $140 this is definitely an expensive tablet holder, but if you are a pro shooter and need your tablet to work perfectly in all situations (like we do) – it is worth every cent.
Miscellaneous parts
323 Quick Release Adapter Clamp – the original Manfrotto 323 RC2 are great but expensive – you can get these knock off units for under $8 and they seem to work great (we have more than half a dozen of those being used for different projects).
Nylon Velcro Cable Tie Straps – these are super handy for securing cables and other small objects – they come in packs of 10 and we are already at the end of our 3’rd pack with several others on the way. Under $2 for 10 units.
Long QR Plate – this is what allowed us to connect the camera behind our cage. It will run you down about $13.
1/4″ D-Ring Screw – these are super useful for DIY builds – we have short and long ones – they cost about $1 per unit.
Aluminum PCB Instrument Box Enclosure – This is an electronic project case measuring -100*74*29mm – it has a very good fit for the Anker E4/E5 battery and cost under $7. It needs very little modifications but you will need to drill two holes and we used two 1/4 Inch Dual Nuts Tripod Mount Screws which are also under $1 a unit (without the nuts – we used small regular 1/4″ nuts).
Cables – we hate cables and try to avoid them when we can, but we needed cables to power the DR70D and the AVX and so we got 2 short 30cm right angle retractable micro B USB data charge cables from e-bay for $3.5 a pop plus an angled 3.5mm cable to connect the DR70D back to our DSLR for $2.5.
Conclusion
This build came from necessity. In the past it used to take us half an our just to put all the components we needed for a shoot in place. Now with this rig we can start shooting in just a few minutes and sometimes even less and it makes things so simple – especially when we shoot outside and need to carry everything with us.
It is probably not perfect but for our current needs it is as close to it as possible. The total build (at least when you consider the basic hardware without the camera/lens/recorder/tablet and tether tools accessories) is around $100 which we can consider pretty inexpensive (especially when you can find many name brand cages which start at 3-5 times this price.
Our rig all assembled from the front
 We would like to thank Samsung and tethertools who contributed their products to the creation of this project.
You can check out more LensVid exclusive articles and reviews on the following link.
You can support LensVid by shopping with our affiliate partners
Affiliates: Amazon, B&H, Adorama and E-bay.
Why should you trust us?
4 comments